Kitchen Renovation With Hardwood Floor

Are you improving your kitchen non-stop? It can be a painstaking and irritating process, especially if you are doing it on your own. Imagine you pull down all your cabinets, sand them down and paint. You buy all the materials you will need and set about tearing down what’s old. What can you do with space? Kitchen renovation should be planned well and executed with efficiency. It would help determine your goals, purpose in the room, and what you want to achieve. Doing a kitchen renovation well is a process that involves you pulling together a concept, demolition, planning, and new designs. However, you cannot go about kitchen renovation without a clear understanding of your project’s goals, dreams, and goals. To make sure that your goals are correctly attainable, you must define your goals. To help you achieve your aims and fulfill them, you need to determine your kitchen goals. You want to figure out what you want in your kitchen and what you could get.

Start with the vision, the purpose of your kitchen, and your goals. Once you get your ideal and idea, all you have to do next is take the time to research. Gather information for your kitchen, find out the pros and cons of various styles and designs. Start comparing and contrasting designs, materials, and products. One of the essential things in finding your ideal kitchen fit is determining your concentration on the room’s specific aspects. Take stock of what you have and decide which parts you will use and which features you can do without. Check the area and existing space of your kitchen to eliminate a wall or maybe relocate a wall.


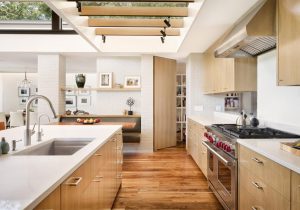
Also, give your kitchen a new look by working with a professional kitchen designer. Their expertise is vital in customizing your surroundings to enhance the area without making holes in the walls. Another essential aspect of kitchen renovation is the space. Please measure the size for your renovation and design it according to your preference. Ensure that you give at least a 30% allowance; this will help get a permit if necessary. Set boundary lines with your layout/plan and work around them, perhaps add or reduce some parts and furniture to give the best settings for your needs. Make the best of the space you have and maximize the efficiency of every person using your kitchen. Add or remove some parts if necessary and search for a solution to maximize distance from another aspect.


Kitchen renovation can be challenging if you are not confident in designing it or don’t possess the know-how to execute it. Know your way to deal with problems and obstacles that could reduce the overall project’s duration. You aim to find a solution and people who can make it happen for a faster and easier means.


Knowledge and confidence will surely save you time and money and your kitchen renovation projects’ burden. How many times have you seen some parts that were not so accessible in your old kitchen? Finding solutions for this problem is brilliant as you can create a new layout or change some framework. Kitchen renovation has many possible benefits and uses as long as you know what you want to achieve for your project in the end.

If you want to renovate your kitchen floor, you can visit Kai Hardwood Flooring for sanding and polishing. Or you can read  review about them here.

Choosing Your Wooden Flooring

When choosing your wooden flooring, there are several options available to wood flooring enthusiasts. Understanding the different types of wooden flooring and how they are installed will enable you to be sure you are choosing a product that will suit your home’s needs and style, as well as your budget.


Hardwood Flooring is a natural, solid-based flooring material that has a beautiful texture. Compared with other types of flooring, it does not have those smooth and even surfaces as opposed to vinyl or laminate flooring, where even tiles or stone flooring can feel cold and clammy to the touch, especially in the colder winter times.


There are many different types to choose from, one being oak, a hardwood often prized for its strong finish and grained appearance, or ash, which features a more rough texture, and is widely used for workshops and bathrooms where dust bunnies can be a problem. For a softer look in the home, solid pine can be the ideal choice, pine is a very cheap softwood that is used for stage, rail, and moldings as well as flooring, with a beautiful subtle finish and warm tones, but they can start to look cast-off in a room if not properly looked after.


Oak and pecan will stay in top-class condition for many years, giving you flooring that will look great no matter what style of home you live in. Workload won’t be an ongoing issue with a hardwood floor, and it is essential to understand wood rot can occur in such low moisture indoor environments. Regular cleaning and maintenance will ensure that your wooden floor will stay looking great.


Regular or light cleaning doesn’t always help with the white spots. Just like wood polish, the use of a broken powder on your wooden floor would not rub the spots out as the place where the wood meets the lifter will be left checklist, as the powder will heat up and rub, the spots will start to lose their color, which gives you a better grip when vacuuming. But only wearing shoe coverings will not remove dirt. If you make your solution with water and a cloth, and when the solution has dried, if possible, then use scotch bright or old steel wool against the grit before vacuuming. Then this will remove just as the unsuitable ground while leaving behind the dirt gathering dust and debris. 

General maintenance instructions: 

  1. Add a pre-inspection point oil. Pre-inspection point oils are used to create a slippery surface, especially for domestic use; you can choose which color you prefer depending on when your flooring was installed.
  2. Keep cleaning your wooden flooring quite often and clears out any grit or sand; this is pre-timed maintenance but leaves a sparkling surface. The addition of a pre-inspection solution will ensure that the wood finish will stay even, smooth and brilliant throughout the life of your wooden flooring. 
  3. Rust redeeming agents act as sweeteners; a bubbling solution is the best method to remove any rusty colors from your wood flooring. 
  4. Water will remove all stains, and the process of water blasting will again make these areas shinier and more lustrous. 
  5. Vacuum when the solution has dried to avoid scratches and dirt in the finish. 
  6. Choose the best broom for your staircase; buying a house broom is unnecessary when the wood is that bad; the solution will get into any cracks and help remove any clumps. 
  7. Why not use scotch bright but remember that because it is a primitive cleaning agent powerful, we can only use it to light a minor spot, then using Scotch Bright to remove these tiny particles is a terrible way to use it. 
  8. Painting and varnishing fluids will work on a beautiful wooden floor; few wood finishes are hard-wearing, oil and wax-based, and educated on the product, the brush should have a stiff bristle that can rub into the wood. 

Refinishing hardwood floors for kitchen and dining room


Before you begin refinishing your timber floor, check that there are no loose nails or cracks in the floorboards. If necessary, nail the floor back in place to provide extra support in the case of ceiling or wall cracks. As the floor may not be in the best of condition, you should consult with a hardwood floor service expert to evaluate your best flooring options. You can sand the area lightly with fine-grit sandpaper for all imperfections in the wood, removing all dirt and dust. Then, you’ll want to use about a quarter cup of water mixed with two quarts of white distilled vinegar to a gallon of hot water.


Begins to fit and deter the dirt and other impurities in the wood

Wipe the spots where the acid has spayed to remove the entire dirty spot. You can use the same solution on the spots where the old top board paint used to be. Remember that your objective is to remove the glue and paint. A warm, soapy water solution will not remove the glue because it cannot allow the glue to dissolve. You can also use a plasma cutter or sandblasting machine to remove the old wood. For systematic removal, apply lots of pressure to the area and try to avoid damaging the wood.


Replacing the damaged boards

Some wood may need to be replaced because of permanent damage. There you should use a putty knife to spread a thin layer of putty into the crevices until the screws raise them. Purchase the highest quality replacement flooring you can afford. Also, plan the expansion gaps as you refill the spot with putty. If the hardwood floor surface is too high for your to roll or slide your samples onto, you can use pl Pete tongue-and-groove boards or “butcher’s blocks” instead. nic-nacs.com This way, you can add extra strips along the length of the sample. Gluing strips fill the gap between sample and strips, apply a flexible drywall compound, which forms a new wood patch over the damaged structural wood, over the strips. Apply a second layer of drywall compound around the sample’s sides, ensuring that the wall is clean between coats. Check with the hardwood floor service expert for advice or the recommended techniques to be safe with the current conditions of your floorboards.


Waiting until the first coating dried before finishing the job

Once the patch has dried (usually 24 to 48 hours), use a sanding sponge to sand the joints until the sample fits into the level and the dimensions that you worked out using your wood boat plans. Remember to use 50-50 wood-chips for sanding joints. If your sample is larger than the 1-inch depth of your sample, repeat the process until the spans match underneath the ½-inch gap you created using your plans. Changes you’d like to add floor trim, cut out its underlayment, and apply your finish or float your new flooring as usual. Wash the defective floorboards with 30 to 50 grit sandpaper. Before doing this, make sure that the water and sanding dust have had time to settle. Then set the samples one-by-one on top of the wood pad for sanding. After about one hour of doing this, take away your sample from the pad. This will eliminate the change of the surface with the sample touching the pad. Repeat the process until the board you are working with matches your samples. gouges like  gouges in hardwood floors are usually 1-inch to 2-inches wide.


Sealing Wipe the damaged boards once more. Clean the surface of the floor with a neutral detergent and a damp sponge. Wash the boards one more time and with 120-grit sandpaper. Your sample will probably require two coats of varnish because the color of the boards’ surface varies from one season to the next. Don’t seal unnecessary areas. The only way to replace these areas with sealant is to strip and refinish the floor completely.